

There are two ways to produce fifty personalized certificates. The first is to open a design file fifty times, change one name, export, repeat, and lose your mind somewhere around card twenty. The second is to let a template do the repetition while you handle the design.
That is the whole idea behind Bulk Card Studio in MockupTown. You design one card. You bring a list of names, roles, or any other data. The tool combines them into as many finished cards as your list has rows. What would take an afternoon of copy-pasting happens in the time it takes to upload a file.
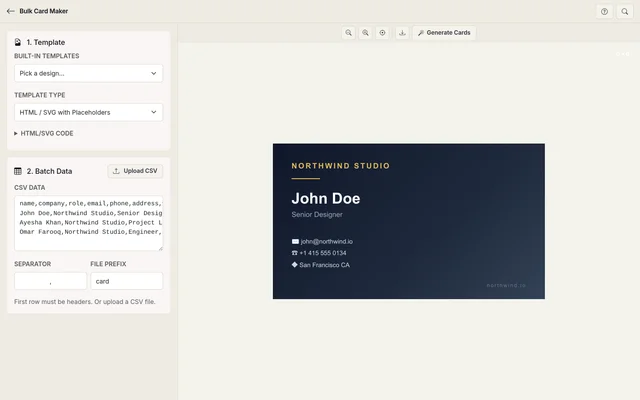 Bulk Card Maker.
The three pieces of the pipeline
Think of it as mail merge, but for images. You have a template, which is the fixed part of the card: the background, the layout, the logo. Then you have data, the part that changes per card: names, titles, serial numbers, photo URLs. The tool overlays the data onto the template for every record and renders each one as an image.
The pipeline has three pieces, and each one is dead simple on its own.
1. Set up the template
You can start two ways. For most people, the image route is easiest: upload a background image, a base design in JPG, PNG, or WebP. The tool shows it on a canvas, and you add layers on top for the parts that will change.
The second route is HTML or SVG with placeholders. You paste code that looks like <div>Hello {{name}}</div>, where {{name}} gets replaced with each row's data. This route is more flexible for complex layouts, and it is the right choice if you are comfortable writing markup.
Built-in templates cover the common cases, certificates and ID cards especially, so you do not always have to start from a blank upload.
2. Bring the data
The data is a CSV, one row per card. The first row must be the column headers, so something like:
name,role,email
John Doe,Designer,[email protected]
Jane Smith,Engineer,[email protected]
You can paste the CSV straight into the text area or upload a .csv or .txt file. The tool lets you set the separator if your data uses something other than a comma, and a file prefix for the exported images.
Two practical notes from running a few of these: keep column headers short and without spaces, because they become the field names you will map. And check that every row has the same number of values. A row missing a column quietly shifts everything after it.
3. Map the layers
Here is where the magic happens. You add a layer to your canvas, pick which CSV column feeds it, and choose what kind of layer it is:
- Text. A name, a title, a date. Set font size, color, weight, and alignment.
- QR code. Any column containing a URL or text becomes a scannable QR layer. Perfect for ID cards where each card carries a unique verification code or link.
- Image URL. If a column holds URLs to photos, that column becomes a picture layer, ideal for photo ID cards.
Each layer sits on the canvas where you drag it, and you can preview any individual record to check that everything lines up. Long names, for instance, are usually obvious in preview long before you export a hundred cards.
4. Export the batch
When the preview looks right, render the whole batch. The tool turns each record into a high-quality image, and you download the results as PNGs, either one by one or bundled into a single ZIP. The ZIP is the sane option for anything over a handful of cards.
The batches people actually run
- Certificates and awards. Upload the participant list, map the name and course fields, and produce a certificate for every person at a training, a webinar, or a competition.
- Employee and student ID cards. A spreadsheet of staff or students becomes a set of photo ID cards, complete with a QR layer for verification or door access.
- Event badges and invites. Name badges for a conference, tickets for a gig, invites for a party. Same template, different names.
- Thank-you cards. A donor list or customer list turns into personalized thank-you cards in one pass.
- Social media graphics. Branded quote cards or a promo post series where each card says something different, all sharing the same layout.
The three usual traps
Three problems tend to appear in real batches, and they are all easier to avoid than to fix after export.
Long text. Names and job titles vary wildly in length. Check the longest values in your data during preview, and size the text or the card accordingly. Text that overflows its area in preview will overflow in every export.
Photos. If you use image layers, the URLs have to be reachable by the browser doing the rendering. A photo stored in a locked folder or behind a login will render as a broken image in every card that uses it.
Batch size. Everything renders in your browser, so a very large batch of very large images will take a while and use real memory. A few hundred cards is generally fine; a few thousand will make you wait.
Why this runs locally
This is one of those tools you are glad runs locally. Certificate lists, staff records, and donor data are exactly the kind of files you do not want sitting in someone else's cloud. Bulk Card Studio processes everything in your browser, so your template and CSV never leave your device.
Run one batch
Next time someone asks for "just a certificate for everyone," the answer is no longer a weekend of copy-paste.
Open Bulk Card Studio, upload a template, paste your list, and export the whole batch in one go.
Made with MockupTown, the free all-in-one mockup generator.
Frequently asked questions
What kinds of cards does the Bulk Card Maker in MockupTown handle?
Course certificates, event badges, staff and student IDs, conference passes, coupon and reward cards - plus social banners and share previews. Any layout that repeats with different names, photos or codes per recipient fits the sheet-driven flow.
How do spreadsheet columns become card fields?
One row per recipient in a spreadsheet. Each column header turns into a draggable placeholder, so {{Name}} on the template pulls from the Name column automatically. When you export, each row is rendered into its own card.
Which template formats can I use?
Backgrounds load as PNG or JPG. A photo column swaps in per-person headshots automatically, and finished cards export individually or as one ZIP.
Does the tool send my data anywhere?
Nothing is transmitted. The sheet is parsed locally and every card is composited on your device - the server only delivers the empty page.